Showing posts with label Chef Greg's Personal Favorites. Show all posts

Tuesday, January 15, 2013

Island Pork Tenderloin


Can I just tell you that I LOVE THIS DISH!  This pork will blow your mind - it is so full of flavor.  The unique combination of ingredients come together to make the most delicious pork!  This is what you want to make when you have company (as long as your guests don't mind a things being a little spicy) - this pork will wow your guests!

Island Pork Tenderloin


For spice rub:
2 tsp salt
½ tsp pepper
1 tsp cumin
1 tsp chili powder
1 tsp cinnamon
2 pork tenderloins (2 ¼ - 2 ½ lbs total) trimmed
2 tbsp olive oil

For Glaze:
¾ cup packed dark brown sugar
2 tbsp finely chopped garlic
1 tbsp Tabasco

Stir the spice rub ingredients together in a small bowl and rub all over the pork.  Heat oil in ovenproof 12-inch heavy skillet (such as a cast iron skillet) over medium high heat.  Brown pork, turning occasionally, about 4-5 minutes total.  Remove from heat, but leave pork in skillet.

Stir together brown sugar, garlic and Tabasco in a small bowl.  Pat the mixture on top of the pork.  Place skillet in the oven at 350.  Roast until thermometer inserted diagonally into the center of each tenderloin registers 140 degrees, about 20 minutes.  Let pork stand in skillet, loosely covered with foil for 10 minutes.  

Balsamic Pot Roast

 
The balsamic vinegar really makes a huge difference in flavor AND  it helps to tenderize the meat as well.  This is one the best pot roast I've  made, if I do say so myself.  I know pot roast isn't exciting, but give this version a try - you won't be disappointed!  It is a great Winter Comfort Food

Balsamic Pot Roast

3 lbs beef chuck roast, boneless 
Garlic Powder & Pepper seasoning (You can find this mix in the spice section, if not, just combine 3 parts garlic powder to 1 part ground pepper)
2 tbsp olive oil
1 onion, sliced
2 sprigs of fresh rosemary
2 bay leaves
2 fresh sage leaves
2 cloves garlic, chopped
1 cup red wine
1/3 cup GOOD balsamic vinegar
2 cups beef stock or broth
3 tbsp corn starch
Salt & Pepper
Baby carrots, about a bag
2 medium potatoes, cut into mouth sized pieces

Whether or not you prefer to cook my pot roast in a crock pot, or dutch oven,  I do think it's essential to sear the meat first.  If you have the time, do this the night before:  

Sprinkle garlic powder & pepper seasoning all over the meat.  Heat olive oil on medium-high in a large skillet.  When nice and hot, sear the roast on all sides - couple of minutes on each side.  Remove from pan and place in the bowl of your slow cooker.  Top with the sliced onion, chopped garlic and balsamic vinegar. I use a piece of cheesecloth and placed all the herbs in it, tie it up with kitchen string and place it into the pot - this way you don't need to fish all the herbs out later.  Cover pot and put in fridge overnight.  

In the morning, add the red wine and beef stock/broth.  Cover and turn slow cooker on low and cook for 6 hours.  Add the carrots & potatoes, turn the slow cooker up to high heat and cook for another 2 hours, or until desired tenderness of the vegetables.  Personaly, I prefer them with a bit of a bite to them rather than mushy.

Once everything is done to your desired tenderness, remove the liquid into a large measuring cup or bowl.  I find it easier to remove the meat and vegetables to a plate first, the remove liquid, returning meat and vegetables back to pot.   Let the liquid settle, then skim off the fat.  Put the corn starch into a small bowl or cup, and add COLD water, just enough to cover, and stir until smooth.  Add the beef liquid to a medium saucepan and turn it on medium-high heat and bring to a slow boil.  Add the cornstarch liquid to the saucepan and stir to combine.  Heat until it gets hot and thickens up a bit.  Once you've got the thickness you prefer, turn off heat and pour the gravy/sauce back into the crock pot over the top of meat and veggies.  Serve hot.  


Saturday, March 31, 2012

Arroz con Pollo Verde (Green Chicken w/Rice)


Arroz con Pollo Verde
(Green Chicken with Rice)


One of my all time favorite dishes has to be Arroz con Pollo (Chicken with Rice). It's an easy, inexpensive, and very tasty dish to make.

One of my friends hails from Peru, and enjoys to cook and share with me, and introduced me to a variation of Arroz con Pollo, called Arroz con Pollo Verde. Translated means Green Chicken w/Rice.

I been hooked ever since.

Rather than using a tomato base for the dish as in traditional Arroz con Pollo, it uses a cilantro base.

This is my version of it. The only changes I made was increase the cilantro and added green pepper and jalapeno pepper, added wine, and use chicken stock in lieu of water, along with a couple procedural processes.

The plates all came back empty and licked clean, so I do believe I have a winner here.


Ingredients

For the Cilantro Sauce:
2 bunches fresh cilantro, stems and all, washed under cold water
(this will be about 4 to 6 cups)
1 green bell pepper
2 jalapeno peppers, remove stems and seeds if you don't want it spicy
2 cloves garlic
Juice of half a lime
----------------------------

4 tablespoons vegetable oil
2 chicken breast halves, skin on and bone in
4 chicken thighs, skin on and bone in
2 tablespoons ground cumin
salt & pepper
1/4 cup white wine
1 medium onion, chopped
1/2 red bell pepper, diced
1 carrot, diced
2 teaspoons ground cumin
4 garlic cloves, minced or run thru garlic press
2 cups long grain rice
2 cups of either fresh or frozen peas (don't use canned, yuk)
1 bottle dark beer (about 12 to 16 oz)
2 1/4 cups chicken stock

Procedure

1. Add cilantro, green pepper, garlic, lime juice and jalapeno pepper to blender or food processor, adding about 1/4 cup of water, and puree. You will probably have to add the cilantro in batches. I find a blender works really well. Use stems and all. Use more water if machine bogs down. Should make about 2 to 4 cups of puree. You may get more than you need, but you can save it for a few days. Set aside.

2. Rinse chicken pieces and pat dry with paper towel. Rub the chicken pieces with the 2 tablespoons of cumin, all over, and salt and pepper.

3. Using a large pot, heat the vegetable oil under medium-high heat. Add chicken skin side down, and do NOT CROWD THE POT! If you have to do it in batches, do so. If you over crowd the pot, the chicken will only steam, and not brown properly, leaving you with pale, soggy skin. You want to cook the chicken on each side for about 5 to 7 minutes each side, until nicely golden brown. Remove from pot and put on a plate, and set aside. Don't worry if it is cooked through at this point, as the chicken will be re-added and cooked further later.

4. In the same pot you just cooked the chicken in, add the 1/4 cup of white wine and deglaze the pan using a wooden spoon. Get all those browned bits of delicious flavor off the bottom of the pan.

5. Add the onion, carrot, and red bell pepper to the pan and saute for about 3 minutes. Add the two teaspoons of ground cumin, and the garlic, and saute for about 30 more seconds.

6. Add the chicken stock and the beer to the pot. Allow to come to a boil, and add the rice and 2 cups of the cilantro puree, and stir briefly. Add peas, and return the chicken pieces to the pot at this point.

7. Allow to come to a boil, and reduce heat to a simmer, and cover. Cook for about 20 minutes, check rice for doneness. If there is still liquid, allow to simmer covered for about 10 more minutes, and check again.

7. When done, place rice into a large serving container, and place chicken pieces on top. Garnish with wedged tomatoes and cilantro leaves if you like. EAT!

Thursday, March 1, 2012

Chef Greg's Brussel Sprouts


Chef Greg's Brussel Sprouts

I only use fresh brussel sprouts, only using frozen as a last resort, but NEVER would I use those nasty canned brussel sprouts. Why, when there is fresh available?

I played around a bit with brussel sprouts, I simply love them. This is an easy way to prepare them, and they will definately tantalize your taste buds!

Ingredients:

About two dozen fresh brussel sprouts.
4 tablespoons of butter
4 tablespoons of olive oil
About 1/8 cup of either shredded Asiago, Guyere, or Parmesean cheese.
Salt and pepper to taste

1. Preheat oven to 350 degrees
2. Cut each brussel sprout in half lenthwise, set aside.
3. In a large skillet (oven safe, I prefer to use cast iron), heat the olive oil and butter together on the stove top on medium heat for about 2.5 to 3 minutes, or until hot.
4. Place the brussel sprouts into the heated pan, cut side down. Use a spatula or tongs to do this so you will not burn your fingers.
5. When brussel sprouts begin to carmelize, turn them over on the rounded side, and place skillet into the oven.
6. Let cook in oven for about 7 to 10 minutes, checking periodically to see if they are done, you don't want them to burn!
7. When done, remove from oven and transfer to bowl or platter; salt and pepper to taste, and add shredded cheese and mix (use more cheese if you want more, but for me, I just like the cheese to accent the sprouts).
8. Serve as a side dish to any meal you wish, or do as I do and make this the meal!

Sunday, August 28, 2011

Best Roasted Chicken


Best Roasted Chicken


Anyone can throw a chicken in the oven, cook it until the meat is falling off the bone; but who wants to eat that dry tasteless bird? With just a couple extra steps, you can prepare a moist, tender and delicious bird that your family and friends will beg you to make time and again.

Try to use a whole chicken no less than 5 pounds. I tend to use the Perdue brand, and get one about 6.5 to 7 pounds.

FIRST of all, BRINE the chicken. See my article on how to brine here:

http://chefgregsgormetkitchen.blogspot.com/2009/07/all-about-brining.html


Ingredients:

FOR COMPOUND BUTTER:
1 stick of butter, softened (room temperature)
1 teaspoon fresh thyme leaves
1 teaspoon fresh rosemary (chopped fine)
1 teaspoon fresh parsley leaves (chopped fine)

1/2 teaspoon salt
1/4 teaspoon fresh ground black pepper

Simply put so
ftened butter (NOT MELTED!!) in a bowl, add the herbs and seasonings, and mix together using a fork until combined. If you forgot to take the butter out of the fridge, like I do a lot of times, use the microwave at 10% power for 1 minute, works like a charm for me.

What's great about making a compound butter, is you can use anything YOU want in it. I always have all sorts of different compound butters in my fridge for different occasions.

AROMATICS:
(The stuff your will stuff inside the bird)

1 yellow onion, roughly chopped
1 celery rib, roughly chopped
1 carrot, roughly chopped
1/2 lem
on
6 fresh thyme stems
6 fresh parsley stems
3 fresh rosemary stems
2 garlic cloves, crushed

This is going inside the bird, and will not be eaten, so it doesn't matter how it looks, etc, just chop em up so it all fits inside, you can even leave the peelings on the onion and garlic.

Let's get to the bird:

5 to 7 pound whole chicken

About 8 slices of bacon
salt and fresh ground pepper


Put it all together:

1. Pre-heat oven to 450 degrees. Rinse the chicken out, inside and out, and pat dry with paper towels.

2. Generously salt and pepper inside and outside of the bird, and place on a roasting rack inside roasting pan. If you don't have a roasting rack, you can make a "make-shift" rack using vegetable/po
tato medley. Chop up onions, celery, carrots and potatoes and line bottom of roasting pan, and then set the chicken on top of the vegetables. The main reason I don't like to do it that way is because I prefer the juices from the chicken that collect in the bottom of the pan to make a sauce with. If I put vegetable in the pan, then they soak up all those great juices, and also make the drippings taste like vegetables. I just prefer my drippings to taste like the meat.

3. Using your fingers, GENTLY go under the skin on the breasts, separating the skin from the breast. Start from the rear and go as far as you can, then go in from the front. You are NOT removing the skin, just making enough room between the skin and the meat to push in your compound butter. I generally don't do this to the thighs, since the dark meat tends to stay juicy, but feel free to if you like.

4. Put half of the compound butter underneath the skin on the breasts. Push it in as far as you can, then you can push down on the outside to spread it around.

5. Put the Aromatics inside the cavity of the
chicken, and if needed, tie the legs together using kitchen twine to hold the aromatics in.

6. Take the rest of the compound butter and spread on the OUTSIDE of the chicken, all over. Breasts, legs, thighs, etc.

7. Lay the bacon over top of the chicken breasts, overlapping. I have never neede
d to secure the bacon with toothpicks; the bacon has always stayed in place for me, but you CAN if you want.

8. Place chicken in per-heated 450 degree oven on center rack for 15 minutes.

9. Reduce temperature to 350 degrees and baste chicken with juices in the roasting pan.

10. Continue
cooking until chickens internal temperature reaches 165 degrees when thermometer is inserted into thickest part of the thigh, basting about every 15 minutes. Approximately 2 hours. I have one of those thermometers that stay in the meat while its cooking, and lets me know when the desired temp is reached; it's a great tool to have, and everyone should have one.

11. Remove bacon, and put back in oven for another 15 minutes to brown the breast.

12. Remove
from oven, and as crazy as this may sound, let the chicken rest for no less than ONE hour, but preferably let it rest for the same amount of time you had it in the oven. While the chicken is resting, you can prepare your side dishes, sauces, etc. If you don't let it rest, you will lose all juiciness. "Oh no, the chicken will be cold if I let it rest that long!" No, it will not be COLD, but it will not be steaming hot either, and that is why you want to make gravy or a sauce to put over it.

Use the pan drippings to make a gravy or sauce, and serve with any side dishes you like.

Note about basting
: I tried this same recipe without basting, and it was NO where near as good, so basting is VERY important! Best tool to use is a basting tool, which is basically a big eye-dropper looking device. It allows you to get down into the pan where the drippings are and suck them up without getting burned, then squeeze it out over the top.


Thursday, May 5, 2011

Chicken Roulade Florentine with Roasted Red Peppers & Asiago


Chicken Roulade Florentine
with Roasted Red Pepper & Asiago

The word "Roulade" simply means "rolled up". There are many different types of Roulade that include pork, veal, and chicken. What you roll up in it, well, that's entirel
y up to you!

This particular recipe is one of my favorites. I usually like to serve this with a Rosemary Cream Sauce.

Since there are so ma
ny variations on Roulades, I was hard pressed to find an exact image for this particular Roulade on the WEB, so the main photo is just an example of how a Roulade should look. Keeping this in mind, I was able to procure an image of this recipe that I made the other day for my brother Mike and his family. The image is NOT the best, so I hesitate to use it as the main photo, so I will just include BOTH.

Roasted red bell peppers you can buy in your grocery store, OR you can roast your own if you know how to. For time sake, go for the store bought roasted bell peppers.

Ingredients:

4 skinless, boneless chi
cken breast halves
Salt
Black pepper
2 teaspoons fresh thyme
4 slices Provolone cheese
2 cups shredded Asiago cheese
2 large roasted red bell peppers (need about half a pepper for each piece of chicken)
Bag of fresh baby spinach (usually in the salad section of grocery store)

Toothpicks

Procedure:

Lay out a layer of plastic wrap on counter top. Evenly space out chicken breasts on top of plastic wrap. Place another layer of plastic wrap over top of breasts. Using a meat pounder (or tenderizer tool), flatten chicken breasts out to about 1/4 inch thickness, trying to keep them in a rectangular shape. Be careful not to pound too hard or you will tear the chicken. If you don't have a meat pounder, you can use a rolling pin, bottom of a sauce pan..be creative.

Once chicken is pounded out, remove top layer of plastic wrap and throw away. Liberally salt and pepper both sides
of chicken, laying each piece "skin" side down.

Sprinkle 1/2 teaspoon of fresh thyme onto each breast. Layer one slice of provolone cheese, Asiago cheese, 1/2 of a roasted red bell pepper, and a nice handful of baby spinach. Be very liberal with the spinach, because it WILL shrink substantially when cooked.

Roll up chicken breas
ts lengthwise, tight as you can, but be careful not to tear the chicken. Once rolled, secure with toothpick and place seam side down in baking dish. A 13x9 dish will do just fine.

Bake in 375 deg
ree oven until internal temperature is 160 degrees, about 45 minutes. The baking dish will have liquid from the cooked chicken. You can discard this or save it to use in soup or whatever.

Allow chicken to set for 10 minutes, then slice into medallion sized pieces and arrange on serving plate. Drizzle with Rosemary Cream Sauce or the sauce of your choice.


Rosemary Cream Sauce

1/4 cup white wine
1 cup heave cream
2 springs fresh rosemary
1 TBSP butter

Reduce wine in sauce pan to about half. Add heavy cream and fresh rosemary, allow to steep over low heat (not boiling) for about 10 minutes. Strain out Rosemary, add butter. Serve over desired dish.

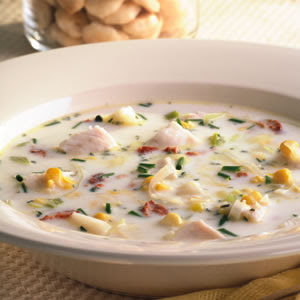
Vegetable Chowder with Jalapeno Peppers

Vegetable Chowder with Jalapeno Peppers


One of my favorite soups to make, full of flavor and gorgeous to look at as well. Recently made this for my brother Mike and his family, and my reward was the silence at the table as they were eating this soup, once in a while coming up for air, saying "Oh my god!" haha.


It's not a dif
ficult soup to make, and I do hope you will try it and enjoy it as much as I have, and others. You can use any of your favorite vegetables that you like, this is just the basic recipe, but you should always include the Mirepoix (onion, celery, carrot) and build from there. If you prefer it more hearty, use more, or make cut the vegetables into a larger dice.

This is also an example of using a "Roux" at the end of cooking instead of at the beginning.


Ingredients:

5 slices of bacon, chopped
Olive Oil (or vegetable oil) as needed
1 Large onion (or two medium), diced medium
3 Celery ribs, diced medium
3 Carrots, diced medium
1 large green bell pepper, diced medium
1 large red bell pepper, diced medium
3 cloves Garlic, minced
1/2 cup dry white
wine
1.5 to 2 quarts chicken or vegetable stock
Chicken or Vegetable bouillon if needed**
2 cups whole kernel corn (or 1 can)
3 tablespoons chopped jalapeno peppers. I prefer the jarred/pickled for the flavor)
3 to 4 medium potatoes, peeled and diced medium
Bouquet Garni (Herb Sachet) (See below)
Salt, to taste
2 cups heavy cream
Roux (See below)
1/4 cup fresh chopped parsley

Bouquet Garni (Herb Sachet)

Make a banquet garni (herb sachet) with the following herbs (put in a piece of cheesecloth and tie with string, photo is an example):

2 bay leaves
6 parsley stems
1/2 teaspoon dry oregano
6 fresh thyme spr
igs
8 to 10 whole peppercorns


Basic Roux

1 stick butter (8 Tbsp)
6 to 8 tbsp flour

Melt butter over medium heat in pan, add flour and whisk until smooth. You want a "blond" roux, so do not let it get dark, will only take a minute or so. Remove from heat and set aside until you are ready for it.

PUT IT ALL TOGETHER

In large pot, saute the chopped bacon until all fat is rendered and is crispy. Use a slotted spoon and transfer bacon onto paper towel leaving the bacon fat in the pan.

Depending on how much fat was rendered from the bacon, you may need to add some olive oil or vegetable oil to the pan. Add the onions, celery, carrots, red and green bell peppers to pot, and saute over medium heat until onions are translucent, about 2 to3 minutes. Add minced garlic and saute until fragrant, about 30 more seconds. Remove all vegetables from pot and set aside. Turn heat to medium high.

Add white wine to pan and deglaze the pan using a wooden spoon to get up any bits that remain in the pan. Let wine simmer for about 1.5 to 2 minutes to reduce slightly.

Turn heat back down to medium and return vegetables to pot, and add chicken or vegetable stock. I always start with 1 quart, and add more as/if needed, keeping in mind you still have more liquid to add later. I tend to end up using about 1.5 quarts of stock when all said and done.

**If your stock is store bought or weak in flavor, supplement with chicken or vegetable bouillon. I only use a brand called "Better than Bouillon", it is a base rather than a bouillon, used in most restaurants. It can be found in most grocery stores now. Not recommended to be used solely, just as a supplement.

Add corn. If using canned corn, also add the juice from the can for added flavor. If using frozen, I like to have it thawed out before adding, but it's OK if you didn't do that, just keep in mind it will add more liquid to the pot. You can also cut it right off the cob. I find I prefer the canned corn with the liquid from the can. You can also use creamed corn, but it will change the texture of the soup. I tend to use creamed corn only if its a corn-based soup/chowder.

Add potatoes, jalapeno peppers, and herb sachet. Bring entire pot to a simmer, cover, turn heat to medium low or low and allow to simmer for at least 20 minutes, or until potatoes are fork-tender (insert fork w/ little resistance without falling apart).

While simmering the soup, prepare the roux in a small pot or skillet, set aside.

Taste soup, add salt to taste. I like to wait until this point to add salt, specially if using bouillon or base supplement as they tend to contain a lot of sodium.

Add heavy cream. Allow soup to return to low simmer, then whisk in the roux and allow soup to simmer and thicken, about 5 more minutes.

Taste soup again, adjust salt/seasonings if needed.

Add chopped fresh parsley right before serving, top each bowl with a few bits of the bacon pieces if desired.

Sunday, March 27, 2011

Quick and Easy Double Layer Fudge


Double Layer Fudge


I am not a huge baker, I tend to like cooking more, so this blog will probably 90% cooking to 10% baking. When I come across a baking recipe I like, I will post for all to use.

This recipe is NOT my own, credit actually goes to Baker's Chocolate, where I came across this recipe. It sounded easy, and good, so I made it, and gave it out to co-workers and friends who just raved about it. I knew I had a winner, so I wanted to share it with everyone. Next time you're in the mood for some fudge, give this recipe a try, you will not be disappointed.

YIELD: 1 8 inch square size pan, up to 48 pieces, depending on how you cut it.

INGREDIENTS:

8 oz semi-sweet chocolate
1 can (14 oz) sweetened condensed milk, divided.
1/2 cup chopped walnuts
1 teaspoon vanilla extract
8 oz white chocolate

FIRST LAYER:

1. Line an 8x8 inch pan with foil.
2. Using a double boiler, heat water in bottom pot to boiling. In top pan, add 3/4 cup of the condensed milk, allow to heat up, then add semi-sweet chocolate, and turn off heat.
3. Stir constantly until chocolate has melted and creamy.
4. Add walnuts and vanilla, stir into chocolate.
5. Spread into the 8x8 inch foil lined pan, set aside.

SECOND LAYER:

1. Using double boiler (if using same double boiler, make sure you clean it thoroughly before using again), heat water in bottom pot to boiling. In top pan, add rest of condensed milk, allow to heat up, then add white chocolate, and turn off heat.
2. Stir constantly until white chocolate is melted and creamy.
3. Spread over top of semi-sweet chocolate layer evenly.
4. Cover, and place in fridge; allow to set up for at least two hours.
5. Cut into pieces (size of your choice).

Note about Double Boilers. If you do not have a double boiler, you can make one. For me, I have a glass mixing bowl that fits perfectly over one of my other pots, makes a great double boiler. You can do something simular. Just make sure whatever you use is safe for the heat, etc. Check out the link below on double boilers, and making your own.

Double Boilers: Making your own

Rosemary Steak


Rosemary Steak

One of my favorite herbs to use is Rosemary. Fresh Rosemary of course. The flavor it infuses in meats is delightful. With spring here, warmer weather coming, and the grills coming back out, give yourself a treat by trying out this recipe. After the steaks are finished, top with the delightful Rosemary Butter.

YIELD: 4 Steaks

INGREDIENTS:

4 New York Strip Steaks, about 12 ounces each
Olive Oil
Salt
Pepper
2 cloves garlic, minced
8 sprigs fresh Rosemary

1. Lay out the steaks on a large platter or baking dish. I find a 13x9 baking dish is perfect size for this.
2. Sprinkle one side of the steaks with olive oil, salt, pepper, and rub half the garlic onto each steak.
3. Flip each steak over, placing one sprig of Rosemary UNDER each steak. Sprinkle tops of steaks with olive oil, salt, pepper, and rub in rest of garlic. Place one Rosemary spring on top of each steak. Cover with plastic wrap, and set aside and let rest for at least 45 minutes.
4. TIP: Let the steaks come up to room temperature before you cook them.
5. Grill or pan fry the steaks until at desired temperature. For me, that is Medium Rare. Use the temperature chart below if you like.
6. let steaks rest no less than 10 minutes before serving. Top with Rosemary Butter.

Rosemary Butter

1 stick of butter (8 tbsp)
1 sprig Rosemary

1. Melt butter over low heat, add sprig of Rosemary, let steep in butter for 10 minutes. If using unsalted butter, add salt to taste.
2. Keep temperature LOW, you don't want to brown or burn the butter.
3. Spoon over finished steaks.

Temperature Chart


Wednesday, February 23, 2011

Chicken Cacciatore


Chicken Cacciatore

I've always loved my mom's Chicken Cacciatore when I was growing up. She would slow cook it with stewed tomatoes all day, and the chicken would be falling off the bone. Only complaint is that she didn't make it often enough! I often wondered if I could improve her recipe, but I should of been slapped across the face for even thinking I could ever do better than mom!

I also wasn't able to replicate her version very well either, since I never paid attention to what she was doing. I came close, but still, nothing like Moms! This recipe was derived for the common folk, using ingredients that would satiate any palette. I added the rich cremini mushrooms, and steered away from using those whole tomatoes, dicing them instead. A few fresh herbs, wine reduction, and searing of the chicken later, I developed this very tasty Chicken Cacciatore recipe, that I hope you will try and enjoy!


Serves 4

Ingredients

* 2 to 3 tablespoons olive oil
* 1 (3-pound) chicken cut into eighths
* Salt and freshly ground black pepper
* 1 pound cremini mushrooms, quartered
* 1 large red onion, halved and thinly sliced
* 1 large yellow bell pepper, thinly julienned
* 1 serrano or jalapeno chile, finely diced
* 3 cloves garlic, thinly sliced
* 1/4 teaspoon red chili flakes
* 1/2 cup dry red wine
* 1 cup chicken stock or broth
* 1 (15-ounce) can diced tomatoes and their juices
* 3 sprigs fresh rosemary
* 2 tablespoons aged balsamic vinegar or capers
* 3 tablespoons chopped fresh basil leaves
* 1 pound spaghetti (size 8 or 9) cooked al dente
* Basil sprigs (optional for garnish)
* Freshly grated Parmigiano-Reggiano


Directions

Heat 2 tablespoons of the oil in a large Dutch oven over high heat. Season the chicken pieces on both sides with salt and pepper and place in the pan, skin side down and cook until golden brown, 3 to 4 minutes. Turn the breasts over and cook until golden brown, 2 to 3 minutes. Remove the chicken to a large plate. Do in batches if needed, do NOT crowd the chicken in the pan or you will end up steaming the chicken.

Add the remaining oil to the pan and heat until almost smoking. Add the mushrooms and cook until golden brown, season with salt and pepper and remove to a plate.

Add the onion and bell pepper to the pan and cook until soft, 3 to 4 minutes. Add the serrano, garlic and chili flakes to the pan and cook for 1 minute. Stir in the wine and cook until almost completely reduced. Add the chicken stock, tomatoes, and rosemary and bring to a simmer. Return the chicken and mushrooms to the pan, reduce the heat to medium-low, cover the pan and cook until the chicken is tender, about 30 minutes. Remove the chicken with a slotted spoon to a large shallow bowl and tent loosely with foil.

Increase the heat to high and cook the sauce, stirring occasionally, until slightly thickened, 8 to 10 minutes. Season with salt and pepper, stir in the vinegar and basil and pour the sauce over the chicken. Garnish with fresh basil sprigs. Serve over spaghetti and sprinkle with grated cheese.

Wednesday, January 19, 2011

Pico de Gallo vs. Salsa??


I get the question, "What's the difference between Pico de Gallo and Salsa?" Depending on who you may ask, depends on the answer you receive. Popular answer are, "Salsa is cooked, Pico de Gallo is raw", or "Salsa is more saucy whereas Pico de Gallo is more like a relish", and some people say there is no difference, they are the same. I could get into the break down of the translations of the words and all that, but do I REALLY want to bore anyone to tears?

For me, my answer tends to compile a few popular answers: Pico de Gallo is raw and not saucy, whereas Salsa is cooked and is saucy.

Between the two, I much prefer Pico de Gallo style.

If I go to a Latin themed restaurant, and they drop a bowl of jarred salsa in front of me, I get up and walk out. Pico de Gallo and salsa is so easy to make, there is NO reason why it can not be made fresh. If they can not take the effort to make fresh salsa, I can only imagine what the rest of the meal would be like.

I have bought jarred salsa's before, and have always come up disappointed. So I always tend to make my own Pico de Gallo. Last week, I saw a jarred "Pico de Gallo" so I had to try it. To say I was disappointed in the product is just the tip of the iceberg. It was horrible, and it ended up in the trash. And for those of my readers, if you use jarred salsa's, do yourself a favor and TRY this recipe next time you want to have chips and salsa. The freshness and flavor bursts will overwhelm your taste buds!

If you look online for a Pico de Gallo recipe, the first thing you will notice is everyone has their own version of it. While most of the ingredients remain the same, there are definitely many variations on it. This is my version, hope you try it, and hope you enjoy it!


Pico de Gallo
----------------


YIELD: about 2 cups

1 small red onion, diced small (about 1/4 cup)
2 large jalepeno peppers, seeded and ribs removed, diced small (leave seeds & ribs in for hotter product)
1/2 of a green bell pepper, diced small
2 cloves of garlic, either minced or use a garlic press
2 large, very ripe tomatoes, diced and seeds removed. About 1 1/2 cups
1/4 cup fresh cilantro, chopped fine.
1/4 teaspoon salt
1/4 teaspoon ground pepper
Juice of one lime


Combine all ingredients together in a bowl. Serve with tortilla chips of your choice. It is better if you let it sit for a day in the fridge, but it is just fine to serve right away as well, your choice depending on when you actually need it.

Wednesday, July 14, 2010

Beef Bourguignon (modified)


For those of us who have seen the movie "Julie and Julia", we saw the wonderful French dish called "Beef Bourguignon" made in the movie, and have wanted to try it.

If you looked up Beef Bourguignon, you would see it is a daunting recipe, labeled as "difficult", for advanced cooks. So most people will not attempt to make it.

What is Beef Bourguignon? Bascially, its a beef stew, but yet SO MUCH MORE! The richness of the flavors are far and above any of the basic beef stews you may of had in the past.

Well, I have taken the daunting recipe, and modified it to make it MUCH more simple, keeping all the cooking on the stove top, and omitting the pearl onions, which are the biggest pain in the rear to peel and prep. Instead of using "lardons", I substituted regular sliced bacon.

So try out this modified recipe of mine, and enjoy the rich flavors with out undertaking a major task.


Beef Bourguignon (modified)

6 ounces Bacon
3 pounds Stew meat, Cut in 1" cubes
2 medium Onions, Diced
1 each Carrot, Sliced
1/2 teaspoon Salt
1/4 teaspoon Fresh ground pepper
2 tablespoons Flour
3 cups red wine, full bodied, liked Beaujolais, Cotes du Rhone or Burgundy
3 cups Beef stock, Use more or less as needed
1 Tablespoon Tomato paste
1 teaspoon Fresh Thyme (if using dry thyme, reduce to 1/2 teaspoon)
1 Each Bay leaf, crumbled
1 stick butter (1/4 pound or 8 tablespoons)
6 cloves garlic, minced
6 Each Spring onions, Sliced, including most of green stem
3/4 cup Beef stock
1 pound Cremini mushrooms, cleaned and sliced

-----------------------------------------------------

1. Heat dutch oven over medium high heat. Medium dice the bacon and add to dutch oven and redner the fat, letting the bacon crisp, but NOT burn. Remove bacon from pot with a slotted spoon and let drain on a paper towel.

2. Dry beef in paper towels; it will not brown if it is damp. Heat the bacon fat in same pot until almost smoking. Add beef, a few pieces at a time, and sauté until nicely browned on all sides. Remove beef from the pot and set aside.

3. In the same fat, saute the diced onions and carrot, until just turning brown. Pour out the excess fat.

4. Return the beef and bacon to the casserole and toss with 1/2 teaspoon salt and 1/4 teaspoon pepper.

5. Sprinkle on the flour and toss to coat the beef lightly. Let cook over medium high heat until the beef developes a nice brown light crust.

6. Stir in wine and 2 to 3 cups stock, just enough so that the meat is barely covered.

7. Add the tomato paste, thyme, bay leaf and bacon. Bring to a simmer on top of the stove. Slow simmer for about an hour, checking meat for tenderness. If meat is still tough, let slow simmer longer.

8. While beef is simmering, melt the 1 stick of butter in a skillet over medium heat. Add the minced garlic and let the butter and garlic simmer for about 2 minutes, then add spring onions and the mushrooms and saute until mushrooms until mushrooms are nicely browned. Add the 3/4 cup beef stock and let simmer until the mushrooms have absorbed the liquid, or reduced. Set aside.

9. Keep checking the beef, adding more stock if needed to keep the meat covered. This dish is meant to be very thick, not liquidy.

10. When beef is ready, add the mushrooms.

This is great served over home made egg noodles (see this recipe in my blog as well).

Tuesday, March 9, 2010

Classic Rub for Meats, Poultry and Fish - Cajun Spice Mix


I literally make huge jars of this stuff I use it so much! This is the herb and spice combination that is used to make "Blackened" meats, but it is a versatile mix that you will find yourself using on a lot of a variety of things. I will be posting some recipes that will call for this spice mix in the near future, so get your palettes ready for a culinary delight!

Part of this recipe calls for Cayenne Pepper. If you are adverse to spicy foods, then you can simply leave it out, it will not effect the flavor.


Classic Rub - Cajun Spice Mix

Ingredients:

  • 4 tablespoon Paprika
  • 2 tablespoons Salt
  • 2 tablespoon Onion powder
  • 2 tablespoon Garlic powder
  • 1 tablespoon Cayenne pepper
  • 1 tablespoon White pepper
  • 1 tablespoon Black pepper
  • 2 tablespoon Thyme
  • 2 tablespoon Oregano
**You can use 2 tablespoons of black pepper in lieu of the white pepper if you don't have any.
**Just double or triple this recipe if you want to make more at one time.

Just mix all ingredients well, and store in an air tight container.

Monday, February 15, 2010

Homemade Chicken and Noodles


What is the ultimate Comfort Food? We each define our own Comfort Foods, which we develop growing up, depending on what foods your family had that brought you good memories and of course good flavor!

For me, the ultimate Comfort Food has to be my mom's Chicken and Noodles, with homemade egg noodles, served over a helping of real mash potatoes. It's a rib sticking, delicious meal, which brings me back to some great and fond memories growing up with each bite.

The noodles take time to prepare, and simmering a whole chicken and then de-boning it probably makes some people say "oh, not for me", but let's not be lazy, the taste and love showed by the effort of doing it right will far outweigh anything you can do from a package or (gulp) fast food.

Plan this dish ahead of time, and make the dough for the noodles a day before, keeping in the refrigerator in a covered bowl overnight. This will allow the glutton to relax, and makes for a much easier time rolling out the dough. But you CAN make this same day, it will just be harder to roll out.

Mom's Homemade Chicken and Noodles

For the Egg Noodles:

2 1/2 cups all-purpose flour
1/8 teaspoon salt (or a "pinch")
2 large eggs, beaten
1/2 cup milk
1 tablespoon butter (cold)

In a large bowl, stir together the flour and salt. Add the beaten egg, milk, and butter. Knead dough until smooth, about 5 minutes. If dough is too flakey, add a little bit more milk if needed. Let rest in a covered bowl for at least two hours, or overnight.

On a floured surface, roll out to 1/8 or 1/4 inch thickness. I find it a lot easier to divide the dough into two and roll out each separately, saves space. Cut into desired lengths and shapes, i simply use a pizza roller. Or if you have a pasta machine, go for it.


Allow to air dry before cooking for at least two hours. I simply hang the noodles on hange
rs, works really well.


Cook fresh pasta in a large pot with the chicken stock from when you simmered the chicken (see below). Cook until al dente, and remember that fresh pasta does not take as long to co
ok as store bought.

For the Chicken:

1 Whole Chicken
1 tablespoon salt
1 onion, sliced in half, peeling left on
1 rib celery, roughly chopped
1 carrot, roughly chopped
2 springs fresh rosemary
8 whole peppercorns
1 bay leaf

Mashed potatoes (your recipe)

Place chicken in large pot, add all the ingredients, and add cold water to cover the chicken.

Place on stove top over med-hi heat until it comes to a boil, then reduce heat to about medium-low, cover and allow to simmer for at least an hour. Make sure it is simmering and not boiling. You want to have some bubbles, but not a rapid boil. This will keep the chicken moist. I usually let the chicken simmer until it is falling off the bone.

Once chicken is done, remove chicken from pot, it may fall apart, which is just fine, and place it on a large platter, and put in the freezer for 15 minutes so it will cool down enough to de-bone.

While the chicken is cooling off in the freezer, strain the stock, and return to the pot, and start making mashed potatoes. You can actually make the mashed potatoes earlier, just set aside in a covered bowl. The heat from the chicken and noodles will heat them up just fine.

Once the chicken is cool enough to handle, separate the skin and bones from the meat, being careful to leave out the smaller bones.

Get the stock to a boil, and then add your egg noodles. If you don't feel you have enough stock, simply add some water to make up the difference. When noodles are done, add the chicken meat and mix. The flour used in making the noodles should thicken up the stock some.

Season to taste! Serve over mashed potatoes.

Rhonda's Banana Bread


My cousin, Rhonda Doan Forshey, gave me what I consider the best Banana Bread recipe I ever had. It is simply wonderful! With Rhonda's blessings, she is allowing me to share her recipe with everyone else, so without further adieu, here it is!

BANANA BREAD

¾ Cup marg (room temp)
1&1/2 Cup Mashed ripe bananas
1teasp vanilla
1teasp Baking soda
1&1/2 Cup sugar
2 Eggs
2 Cups flour
1 teasp salt
½ Cup sour milk (or 1/2c reg milk and with
1 Tablespoon vinegar or lemon juice)

Cream margarine and sugar.

Add bananas, eggs and vanilla. Blend well.

Sift flour, soda and salt together.

Add dry ingredients to creamed mixture alternating with milk.

You can add ½ cups chopped nuts....Rhonda adds about ½ bag chocolate chips instead of the nuts.

Pour into greased and floured pan.. Bake at 350 until bread test done. I use the tooth pick method to see if is done. It takes an hour or a little longer to bake.

Makes 2 med size loaves.

The secret is to then hide it for a couple of days so no one eats it. Rhonda says it tastes better after it sets a couple of days.

If you have a lot of ripe bananas go ahead and double this and the baked bread freezes well.

Friday, December 18, 2009

Spiral Ham with Citris Glaze

Personally, I LOVE a good ham for Christmas! I always get a spiral cut ham, and add a simple glaze to it to hook it up. This recipe here includes a really tasty glaze that I tend to always go back to. Hope you get to try it!


Ingredients

  • 1/2 cup dark brown sugar
  • 1/2 cup honey
  • 1/2 cup fresh orange juice
  • 1/2 cup peach nectar
  • 4 to 5 chipotles peppers, minced
  • 5 pound spiral cut smoked ham

Directions

Preheat the oven to 375 degrees F.

In a small bowl, mix together the brown sugar and honey. Set aside.

In another small bowl, mix together the orange juice, peach nectar and chipotles peppers.

Arrange the ham, cut end down, in a large baking dish. Pour a few tablespoons of the juice mixture over the ham and in between the layers. Bake for 30 minutes, basting every 10 minutes with the remaining juice mixture.

Remove the ham from the oven. Reserve about 1 1/2 cups of cooked juice from baking dish. Brush the honey mixture on the ham and return to the oven to bake for an additional hour until a crust forms and the ham begins to caramelize. Remove from the oven to a serving platter and serve with the reserved baking juice.

Herb Roasted Turkey Breast with Pan Gravy

If you and your family and guests only desire the white meat, then definately go with just using a Turkey Breast rather than the whole bird. This particular recipe is fantastic, and if tradition doesn't keep you held to the whole bird, you will find yourself using this one more often than not!

NOTE: Use FRESH herbs! Not the dried herbs!

Ingredients

  • 1 small (golf-ball sized) onion, peeled and coarsely chopped
  • 1 lemon, scrubbed clean
  • 12 fresh sage leaves
  • Large handful fresh flat-leaf parsley (about 1/2 cup, from 12 stems)
  • 3 tablespoons extra-virgin olive oil, plus more for oiling pan
  • 1 teaspoon salt, plus more as needed
  • 6 fresh bay leaves
  • 4 tablespoons butter
  • 2 boneless turkey breast halves, skin on (about 2 to 2 1/2 pounds each)
  • Freshly ground black pepper
  • 3 tablespoons all-purpose flour
  • 1/4 cup apple or regular brandy (recommended: Calvados)
  • 2 to 3 cups apple cider
  • Salt and pepper

Directions

Preheat the oven to 450 degrees F. Oil a roasting pan and set it aside.

Put the onion into the bowl of a mini food processor. Using a vegetable peeler, peel the zest from the lemon in thin strips, being careful not to cut into the bitter white pith. Add the lemon zest to the food processor and reserve the whole lemon for another use. Chop the onion and lemon zest until fine. Add the sage, parsley, olive oil, and 1 teaspoon salt and pulse until it forms a coarse paste.

Put 2 of the bay leaves and the butter into a small pan and heat over medium-low heat until the butter is bubbling. Remove from the heat and set aside.

Put the turkey breasts on a work surface. Carefully run your fingers between the skin and the flesh from one end, being careful not to pull it completely off, creating a pocket. Season the turkey breasts generously with salt and pepper. Stuff half of the herb paste under the skin of each breast, and spread it evenly under the skin. Transfer the breasts to the roasting pan, and slide 2 bay leaves underneath each one. (The heat of the pan will release the bay leaf oils and flavor the breast.) Using a pastry brush, baste the breasts with half of the bay butter. Place the turkey in the oven and immediately decrease the temperature to 400 degrees F. After 20 minutes, baste the turkey breasts with the remaining butter, and roast for an additional 20 to 25 minutes, until cooked through, and a thermometer placed in the thickest part of the breast registers 170 degrees F.

Remove from the oven, transfer to a platter, cover, and let rest for 15 minutes before carving while you make the gravy.

Put the roasting pan over the burner on medium heat. Sprinkle the flour over the pan juices, and cook, stirring, for a few minutes. Add the apple brandy, and scrape the pan to lift the bits that are stuck to the bottom. Cook for a minute to burn off the alcohol, then, while stirring, pour in the apple cider. Bring to a simmer, and stir until thickened. Season with salt and pepper.

Slice the turkey breast on the diagonal, and serve with warm gravy.


Brined and Roasted Turkey

This is a more involved recipe, but I have included the brine process in this one. This bird turns out so moist, flavorful, and delish, you will want to make it all year!


Ingredients

  • 1 (10 to 12-pound) turkey
  • Brine, recipe follows
  • 4 tablespoons unsalted butter at room temperature
  • 1 large yellow onion, cut into 8ths
  • 1 large orange, cut into 8ths
  • 1 stalk celery, cut into 1-inch pieces
  • 1 large carrot, cut into 1-inch pieces
  • 2 bay leaves
  • 2 sprigs thyme
  • 1 1/2 to 2 cups chicken or turkey stock, for basting

Turkey Broth:

  • 1 tablespoon vegetable oil
  • Reserved turkey neck and giblets
  • 1 large carrot, coarsely chopped
  • 1 onion, coarsely chopped
  • 1 large celery stalk, coarsely chopped
  • 1 small bay leaf
  • 3 cups turkey stock, chicken stock, or canned low-salt chicken broth
  • 3 cups water

Gravy:

  • 4 cups turkey broth
  • 1 cup dry white wine
  • 4 tablespoons unsalted butter
  • 1/4 cup flour
  • Salt and freshly ground black pepper

Directions

Remove the neck, giblets, and liver from the cavity of the turkey and reserve for the gravy. Rinse the turkey inside and out under cold running water.

Soak the turkey in the brine, covered and refrigerated, for at least 4 hours and up to 24 hours.

Preheat the oven to 325 degrees F.

Remove the turkey from the brine and rinse well under cold running water. Pat dry with paper towels, inside and out. Place breast side down in a large, heavy roasting pan, and rub on all sides with the butter. Season lightly inside and out with salt and pepper. Stuff the turkey with the onion, orange, celery, carrot, bay leaves, and thyme. Loosely tie the drumsticks together with kitchen string.

For the turkey broth: Heat the oil in a large heavy saucepan over medium high heat. Add the turkey neck, heart, and gizzard to the pan and saute until just beginning to brown, about 1 minute. Add the chopped vegetables and bay leaf to the pan and saute until soft, about 2 minutes. Pour the stock and 3 cups of water into the pan and bring to a boil. Lower the heat to medium-low and simmer until the stock is reduced to 4 cups, about 1 hour, adding the chopped liver to the pan during the last 15 minutes of cooking.

Strain the stock into a clean pot or large measuring cup. Pull the meat off the neck, chop the neck meat and giblets, and set aside.

Roast the turkey, uncovered, breast side down for 1 hour. Remove from the oven, turn, and baste with 1/2 cup stock. Continue roasting with the breast side up until an instant-read meat thermometer registers 165 degrees F when inserted into the largest section of thigh (avoiding the bone), about 2 3/4 to 3 hours total cooking time. Baste the turkey once every hour with 1/2 to 3/4 cup chicken or turkey stock.

Remove from the oven and place on a platter. Tent with aluminum foil and let rest for 20 minutes before carving. This allows the juices to redistribute through the bird.

For the pan gravy: Pour the reserved turkey pan juices into a glass-measuring cup and skim off the fat. Place the roasting pan on 2 stove top burners over medium heat add the pan juice and 1 cup turkey broth and the white wine to the pan, and deglaze the pan, stirring to scrape any brown bits from the bottom of the pan. Add the remaining 3 cup of broth and bring to a simmer, then transfer to a measuring cup.

In a large heavy saucepan, melt the butter over medium high heat. Stir in the flour and cook, stirring constantly, to make a light roux. Add the hot stock, whisking constantly, then simmer until thickened, about 10 minutes. Add the reserved neck meat and giblets to the pan and adjust seasoning, to taste, with salt and black pepper. Pour into a gravy boat and serve.

Brine:

  • 1 cup salt
  • 1 cup brown sugar
  • 2 oranges, quartered
  • 2 lemons, quartered
  • 6 sprigs thyme
  • 4 sprigs rosemary

To make the brining solution, dissolve the salt and sugar in 2 gallons of cold water in a non-reactive container (such as a clean bucket or large stockpot, or a clean, heavy-duty, plastic garbage bag.) Add the oranges, lemons, thyme, and rosemary.

Note: if you have a big turkey and need more brine than this, use 1/2 cup salt and 1/2 cup brown sugar for every gallon of water.

Pumpkin Bread


A Holiday Favorite, you will find this recipe moist and full of wonderful flavor!


Ingredients

  • 3 cups sugar
  • 1 cup vegetable oil
  • 4 eggs, lightly bean
  • 16 ounces canned unsweetened pumpkin
  • 3 1/2 cups flour
  • 2 teaspoons salt
  • 2 teaspoons baking soda
  • 1 teaspoon baking powder
  • 1 teaspoon nutmeg
  • 1 teaspoon allspice
  • 1 teaspoon cinnamon
  • 1/2 teaspoon cloves
  • 2/3 cup water

Directions

Preheat oven to 350 degrees.

Butter and flour two 9 by 5 loaf pans.

Stir together sugar and oil. Stir in eggs and pumpkin. Combine dry ingredients in separate bowl.

Blend dry ingredients and water into wet mixture, alternating. Divide batter between two loaf pans.

Bake for 30 to 40 minutes or until cake tester comes out clean. Let stand 10 minutes.

Remove from pans and cool.

Tuesday, December 8, 2009

White Chili


Serves 6 to 8.

Adjust the heat in this dish by adding the minced ribs and seeds from the jalapeño as directed in step 6. If Anaheim chiles cannot be found, add an additional poblano and jalapeño to the chili. This dish can also be successfully made by substituting chicken thighs for the chicken breasts. If using thighs, increase the cooking time in step 4 to about 40 minutes. Serve chili with sour cream, tortilla chips, and lime wedges.


Ingredients

3 pounds bone-in, skin-on chicken breast halves , trimmed of excess fat and skin
1 tablespoon vegetable oil
3 medium jalapeño chiles
3 poblano chiles (medium), stemmed, seeded, and cut into large pieces
3 Anaheim chile peppers (medium), stemmed, seeded, and cut into large pieces
2 medium onions , cut into large pieces (2 cups)
6 medium cloves garlic , minced or pressed through garlic press (about 2 tablespoons)
1 tablespoon ground cumin
1 1/2 teaspoons ground coriander
2 (14.5-ounce) cans cannellini beans , drained and rinsed
3 cups low-sodium chicken broth
3 tablespoons fresh lime juice (from 2 to 3 limes)
1/4 cup minced fresh cilantro leaves
4 scallions , white and light green parts sliced thin

Instructions

  1. Season chicken liberally with salt and pepper. Heat oil in large Dutch oven over medium-high heat until just smoking. Add chicken, skin side down, and cook without moving until skin is golden brown, about 4 minutes. Using tongs, turn chicken and lightly brown on other side, about 2 minutes. Transfer chicken to plate; remove and discard skin.

  2. While chicken is browning, remove and discard ribs and seeds from 2 jalapeños; mince flesh. In food processor, process half of poblano chiles, Anaheim chiles, and onions until consistency of chunky salsa, ten to twelve 1-second pulses, scraping down sides of workbowl halfway through. Transfer mixture to medium bowl. Repeat with remaining poblano chiles, Anaheim chiles, and onions; combine with first batch (do not wash food processor blade or workbowl).

  3. Pour off all but 1 tablespoon fat from Dutch oven (adding additional vegetable oil if necessary) and reduce heat to medium. Add minced jalapeños, chile-onion mixture, garlic, cumin, coriander, and 1/4 teaspoon salt. Cover and cook, stirring occasionally, until vegetables soften, about 10 minutes. Remove pot from heat.

  4. Transfer 1 cup cooked vegetable mixture to now-empty food processor workbowl. Add 1 cup beans and 1 cup broth and process until smooth, about 20 seconds. Add vegetable-bean mixture, remaining 2 cups broth, and chicken breasts to Dutch oven and bring to boil over medium-high heat. Reduce heat to medium-low and simmer, covered, stirring occasionally, until chicken registers 160 degrees (175 degrees if using thighs) on instant-read thermometer, 15 to 20 minutes (40 minutes if using thighs).

  5. Using tongs, transfer chicken to large plate. Stir in remaining beans and continue to simmer, uncovered, until beans are heated through and chili has thickened slightly, about 10 minutes.

  6. Mince remaining jalapeño, reserving and mincing ribs and seeds (see note above), and set aside. When cool enough to handle, shred chicken into bite-sized pieces, discarding bones. Stir shredded chicken, lime juice, cilantro, scallions, and remaining minced jalapeño (with seeds if desired) into chili and return to simmer. Adjust seasonings with salt and pepper and serve.